adventures in android flashing part 3
by weekend
Finishing up the required patches, we’ll start with getting DriveDroid to work for cdrom emulation and then applying some wireless patches and changing the kernel config.
DriveDroid
This part was very easy, I found a relevant patch and when I went to recreate it for my kernel, I found that it was already there!
So to test I simply installed the DriveDroid apk from Google Play and tried it out. It worked right away so I had to do literally nothing at all to get it to work (Note: this app does require root).
I think I might actually pay for the ad-free version of this at some point.
Patching
I again started off this patching effort by looking at the already existing patches. I based this off the changes made in the kali-wifi-injection-3.18 patch. This patch also includes the mac80211 injection patch and a bunch more.
I simply looked over the patch file, made the changes manually and created a diff. Then applied that patch to my lineage os kernel.
Creating a patch
This might be a good time to talk about how I make those patches and apply them.
I have a different folder where I cloned the LineageOS/android_kernel_motorola_msm8952
cm-14.1 branch. When I want to change files to create a patch I first create a new local branch with:
git checkout -b newbranch
For instance, in this case I created and checked out a new branch called wifipatches.
Then after making my changes I commit those to that branch and run:
git diff cm-14.1 > ../wireless-kali.patch
And this creates my patch file. Now it should be noted that I could also do something like:
git format-patch --minimal cm-14.1 --stdout > ../motorola__msm8952______kernel_3.10.patch
This also creates a nice patch, including the commit comments and info on who made them. But if it includes several commits that change the same stuff it’ll do so sequentially (so keeping the 2 commits in order) and I don’t really like that.
Applying a patch
Applying the patch to my build environment is fairly straight forward. Since I’m using the exact same kernel repo there as I do to make my initial edits, there should be absolutely no conflicts. I go to the kernel source location (in ~/Code/android/lineage/kernel/motorola/msm8952 for me) and I apply a patch like this:
patch -p1 < ~/Location/To/The/required-patch.patch
Thats it, these changes should now get applied without any problems.
Change kernel config
At this point I fully patched the kernel and compiled it successfully. Which shows… absolutely nothing. Most (if not all) of the changes for the wireless patch are in parts that are probably not included in the default build. To have it included in our kernel, or in kernel modules, we need to change the kernel config.
First we look at ~/Code/android/lineage/device/motorola/athene/BoardConfig.mk which tells us some interesting information.
...
# Kernel
...
TARGET_KERNEL_ARCH := arm
TARGET_KERNEL_CONFIG := athene_defconfig
TARGET_KERNEL_SOURCE := kernel/motorola/msm8952
...
# SELinux
include device/qcom/sepolicy/sepolicy.mk
BOARD_SEPOLICY_DIRS += $(LOCAL_PATH)/sepolicy
For now we’re interested in this athene_defconfig file. The build system will be taking this config as a base, and we want to do the same for generating our new config. To do this go back to the kernel location (for me ~/Code/android/lineage/kernel/motorola/msm8952) and run:
make ARCH=arm athene_defconfig SELINUX_DEFCONFIG=selinux_defconfig
make ARCH=arm menuconfig
In the menuconfig we’ll try following the advice mentioned on the kali nethunter wiki. However I found that attempting to enable all those things gave problems. We’ll discuss that later, for now let’s look at how to use this new config in our lineage build.
The previous commands create a .config file which gets used during a build. However lineage with its build options will fail if you keep it there. The easiest and simplest solution is to simply copy that .config to the arch/arm/configs/athene_defconfig file. Remember to back up the original somewhere else first.
Then just remove that .config and run
make mrproper
There are likely better and more efficient ways to do all that, but we’ll look into that at a later point. First we have to fix all our current problems, and there were definitely problems.
Bluetooth problem
First off, theres a bug in the bluetooth portion of my kernel, so enabling that means it won’t even build. We didn’t even touch that code with our patches, so its not our fault this time!
The problem lies in the drivers/bluetooth/btusb.c file. One problem is simple to solve, just change:
static int reset = 1;to:
static bool reset = true;The second much bigger problem is that its not finding the functions defined in drivers/bluetooth/ath4k.h even though that gets included. I could just strip them out and some things would probably work, but it doesn’t seem worth the risk. And newer versions change so much (and add new dependencies) that I really don’t want to begin debugging it.
I’m not really interested in bluetooth hacking though, so I decided to simply leave it out.
Config problems
I’m not sure how to describe this problem, trying to enable all the things suggested on the kali nethunter wiki except bluetooth meant it would build fine. But that kernel would not boot.
The next post will probably involve delving into what the cause is, or specifically which setting caused it to not boot. But unfortunately it’s a very time consuming process since I have to recompile each time.
Temporary working settings
So to get things to work I changed the kernel config to the absolute minimum required for my external wifi dongle. However I don’t actually have an USB OTG cable to test it yet.
I only enabled the following features:
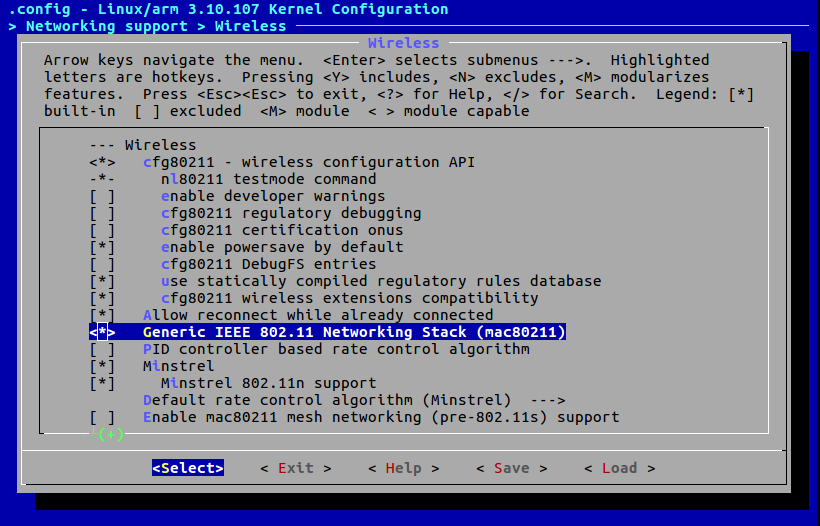
- In “Networking Support” -> “Wireless” enable “Generic IEEE 802.11 Networking Stack (mac80211)”
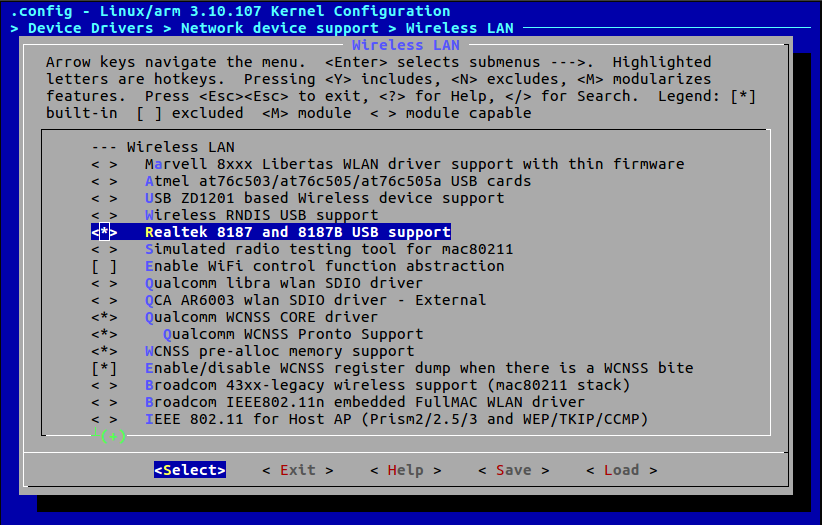
- In “Device Drivers” -> “Network device support” -> “Wireless LAN” enable “Realtek 8187 and 8187B USB support”

by weekend

by weekend
The working config is of course also included in the patches repo.
kali nethunter
Now that we had a booting kernel, we could build a full kali nethunter package too! It installed without issues, though when it came time to download the chroot the nethunter app failed. It is apparently a known issue (though I didn’t see it in any bug reports), and instead I had to download it manually and place the file in the correct location with the correct name.
My nethunter installer didn’t automagically set selinux in permissive mode, though maybe I can add something to that installer so it does (by copying others). I haven’t tested if that’d work though, and if it does, I’m not sure if I want to take that approach. I would much rather have correct SElinux policies that actually work. Or some easy way to set it permissive and back again (“hacker mode activate!”).
Besides that everything seemed to work as expected, I’ll need to do further testing and tweaks until I’m happy with it. Once I’m happy I will completely reinstall everything and finally set up my phone the way I want it.
Improvements
There are several things that need improving. Obviously finding out which menuconfig setting is causing problems is the first (and optionally finding out why it causes problems).
Secondly I’d like to have a kernel image with included dtb file, hopefully shouldn’t be too hard. Last major requirement is getting selinux working nicely with kali. After all those fixes I think it’ll be ready for permanent deployment on my phone.
Secondary objectives
I want to figure out how this nethunter installer actually works, at the moment its black magic to me. I want to have the option to include more, or less apk’s in that installer. Specifically, I’m considering buying the ad-free DriveDroid apk version, because I see this as a useful mod in any situation.
I also want to know exactly what files nethunter installs and where, and which of those are going to get overwritten in case of a system update. If possible I’d like it to play nice with Lineage OS via addon.d so I don’t need to reinstall it. Reinstalling kernel is an option, then at least I can update and put back just the kernel if I need it, or go back to stock kernel if that breaks Lineage OS.
For now I’m taking a break and not working on this for the rest of the day. I’ll be thinking of other things though, so maybe I’ll post about that too!
